Git and Github for Technical Writing
A proposed system for technical writing using Git, GitHub, VS Code, and Markdown
Setting Up
Visual Studio Code will serve as your interface for writing and editing. It will also be the interface for using Git and GitHub to track and share all of your writing activity. By the end of this document, you will have installed and configured everything that is needed for VS Code, Git, and GitHub.
Install Visual Studio Code
Install Microsoft Visual Studio Code from https://code.visualstudio.com/. During the installation process, tick all of the checkboxes on the “Select Additional Tasks” screen.
Install Git
Install Git from https://git-scm.com. Your computer may already have git installed but it won’t hurt to update it. If you are using macOS, I’d suggest installing using the “Binary installer.”
There are lots of questions during the installation process, but you can leave them at their defaults. These are two exceptions (but even these changes are not necessary):
- When asked for a “default editor used by Git”, select Visual Studio Code.
- When prompted, select the “Override the default branch name for new repositories” radio button and enter “main” in the text field.
Sign up for GitHub
Create an account on https://github.com. If you’re a student, I’d suggest signing up at https://education.github.com/students, using your school email address.
Configure Git
To finish configuring the Git software you installed earlier, you will need to type two commands at a shell prompt. Follow these steps to configure access to a shell prompt in VS Code:
- In VS Code, go to View > Terminal
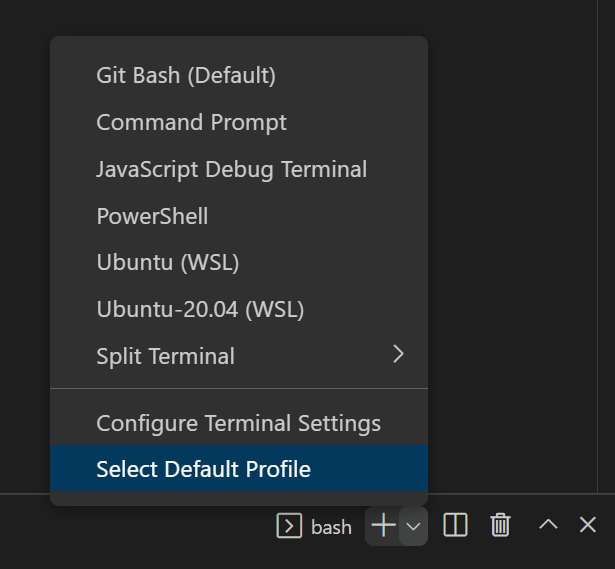
- In the Terminal pane that appears, find the + symbol. Click the down arrow to the right of the + symbol and choose Select Default Profile. From the list that appears, choose Git Bash. If you don’t see Git Bash as an option, choose bash.
- Click the + symbol to open a new terminal.
 |
|---|
| Selecting the Default Shell for the Terminal |
Now that we have access to a bash command prompt, you can type the following commands to configure git. Be sure to include the quotation marks and press the return key after each command.
git config --global user.name "YourUsernameOnGitHub"
git config --global user.name "YourEmailAddress"
To verify that those two commands worked, you can type the following command, followed by a return:
git config --global --list
Add VS Code Extensions
Extensions are a way of adding functionality to VS Code. Several extensions will be helpful as you begin to write technical documents in VS Code. Search for the following extensions by clicking the Extensions icon in the left sidebar. The icon looks like a pile of blocks. For each extension, click its Install button.
- Markdown All in One
- markdownlint
- Grammarly
Configure the Grammarly Extension
Finally, we need to configure the Grammarly extension.
- Restart VS Code
- Choose File > Preferences > Settings
- In the search field, type “grammarly”. This will filter the list of settings to show only those related to the Grammarly extension.
- Under “Grammarly > Files: Include”, click Add Item. Enter the text
**/*.mdand choose OK. - Under “Grammarly > Config: Document Domain”, choose academic.
- Close the Settings tab, by clicking the x at the top of the tab. Your changes are automatically saved.
The Grammarly extension seems to work fine without a Grammarly account. If you have a free or premium Grammarly account, you can link it to the Grammarly extension by following these steps:
- Press
Ctrl+Shift+Pto activate the Command Palette. - Type “grammarly login” and press Return
- Login to your Grammarly account in the browser window that appears.
The Grammarly extension will now perform spell checking and grammar checking in your text and Markdown files automatically, either anonymously or using your Grammarly account.